By Deanna Dames, Portland Farmers Market volunteer
We’ve all been there. You get home from the farmers market with all your beautiful produce and your farm fresh eggs. Then it hits you: a hankering for a good, old-fashioned hard-boiled egg. You carefully select your eggs, place them in the pot, and simmer them to perfection. Your mouth waters just thinking about their gorgeous orange yolks and rich delicious flavor as you gently crush the shell and peel it away, the salt shaker ready and waiting.
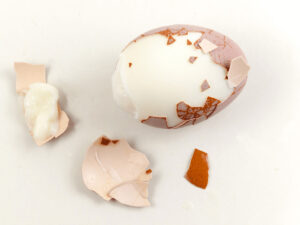
And then you get this:
But why? After talking with numerous farmers, chefs, and egg aficionados, I was consistently given this hard truth: Fresh eggs are harder to peel than older eggs.
There are many benefits to purchasing eggs directly from a farmer, including freshness (eggs sold in grocery stores are often six weeks or older, compared to farmers market eggs, which are often just days old) and nutrition. So now that I had uncovered the scrumptious-ness of farm fresh eggs, often barely a day old at the Farmers Markets, I simply could not revert back to the days of grocery store eggs with their yellow yolks and stiff whites.
I was determined to solve this problem. So, I set out to test some new cooking methods. After a lot of trial and error I am sharing the results with you so you can successfully hard boil a farm fresh egg.
Egg Science: Blame the Membrane
To figure out why fresh eggs are harder to peel, I needed to understand a bit of chicken science: The white (called the albumen) in a fresh egg is slightly alkaline. As the egg ages, the white becomes more alkaline as the dissolved carbon dioxide (a weak acid) it contains dissipates. The more alkaline the white, the easier it is to peel when cooked.
Most home cooks assume that when an egg is difficult to peel, it is because the shell is sticking to the egg white. But it’s the membrane between the shell and the white that is really the problem. So, when an egg is very fresh, the proteins in the white bond to the membrane instead of to one another, and the membrane becomes cemented to the white and impossible to peel away leaving an unappealingly pitted exterior —an especially unacceptable result when you need flawless eggs for deviled eggs or garnishing a salad.
As eggs grow older, the eggshell’s protective coat slowly wears off, the egg becomes porous, absorbs more air, and releases some of its carbon dioxide. This makes the albumen more acidic, causing it to stick to the inner membrane less. The egg white also shrinks slightly, so the air space between the eggshell and the membrane grows larger, resulting in boiled eggs that are easier to peel.
How to Boil an Egg – Let Me Count the Ways
There are many opinions on the “perfect” and “foolproof” hardboiled egg methods so I decided to compare five methods using all the same criteria.
Criteria
I used six eggs designated as “large” for each method (all obtained from our wonderful farms at the various farmers markets around the city) and used only eggs that were fresh from their chickens within 48 hours: delicious and fresh but also an egg-peeler’s worst nightmare! The eggs had not yet seen the inside of a refrigerator, so they still had their protective coating, and hence were all cooked starting at room temperature. After cooking the eggs each way, I peeled them all immediately after cooling them in a five-minute ice bath.
I graded each method from A to F: If most of the eggs cooked a certain way peeled easily, the method got an A. If the shell clung stubbornly to most of the eggs, forcing me to tear the whites, it received a lesser grade.
Methods
- Baking: Grade C-
- Boiling in already-boiling water: Grade C
- Steaming in a pressure cooker (aka Instapot): Grade B+
- Steaming over boiling water: Grade A-
- Starting them in room temperature water and slowly bring to a simmer: Grade A
Methods 1 and 2 produced eggs that were challenging to peel. Additionally, the eggs baked in the oven sported green rings around their yolks and many of the eggs cooked in already boiling water cracked. The pressure-cooked eggs were nicely cooked with Method 3 earning a B+ (however, not everyone has a pressure cooker). Method 4, steaming the eggs, produced mostly easy to peel eggs (however some of the yolks tended to cook lopsided versus centered with this method), so it earned an A-.
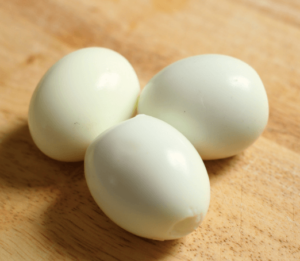
But Method 5 was the winner, earning a solid A because their shells easily slipped off to reveal perfectly smooth whites! Yes, I may have done a happy dance in the kitchen. Maybe…
Out of sheer curiosity I also tested a few other cooking methods that many people swear by:
- Letting the eggs age first (I conformed to the obvious solution which seems to defeat point of eating a farm fresh egg. But my 2-3 week old farm eggs were STILL hard to peel!)
- Boiling them with vinegar (this didn’t work for me…)
- Boiling them with salt (this didn’t work either)
- Using a pin to prick the shells before boiling (I must be too heavy-handed to pull this one off)
- Boiling them with baking soda (this increases the pH…it sorta worked)
- Microwaving them (Just don’t!)
I’m not sure I would call Method 5 “foolproof”, but it worked great for me and now I can easily hard boil and peel my farm fresh eggs each week and savor the nutritional delicious-ness that they are.
Recipe for Method 5:
- Bring eggs to room temperature by leaving them on the counter
- Place the eggs in a pot of cold water just large enough to hold them in a single layer.
- Make sure water is covering the eggs and then slowly bring to a simmer to prevent cracking.
- Boil for 8 minutes, drain, and cool in an ice bath. Note: This produces a slightly softer and creamy yolk. If you want a drier yolk, increase the cooking time to 10 minutes.
- Tap the eggs to break the membrane. Compost the shells.
Related: The Small Farm Ecosystem and the Essential Role of the Chicken